How to Compress a Photo to 100 KB (Without the Guesswork)
University applications, visa portals, job forms and government services all do the same thing: they demand a photo under a fixed size — 100 KB, 200 KB, sometimes 1 MB — and reject anything larger without explaining how to get there.
Most compressors hand you a quality slider and wish you luck. That is the wrong control for this job, and it is worth seeing why.
The slider does not do what the form asks
You need a file size. The slider sets a quality number. The relationship between the two depends entirely on the photo's content — a flat studio backdrop and a detailed landscape at the same setting can differ several-fold — so there is no setting you can learn and reuse.
Worse, the curve is lumpy. Here is one real photo encoded at each step:
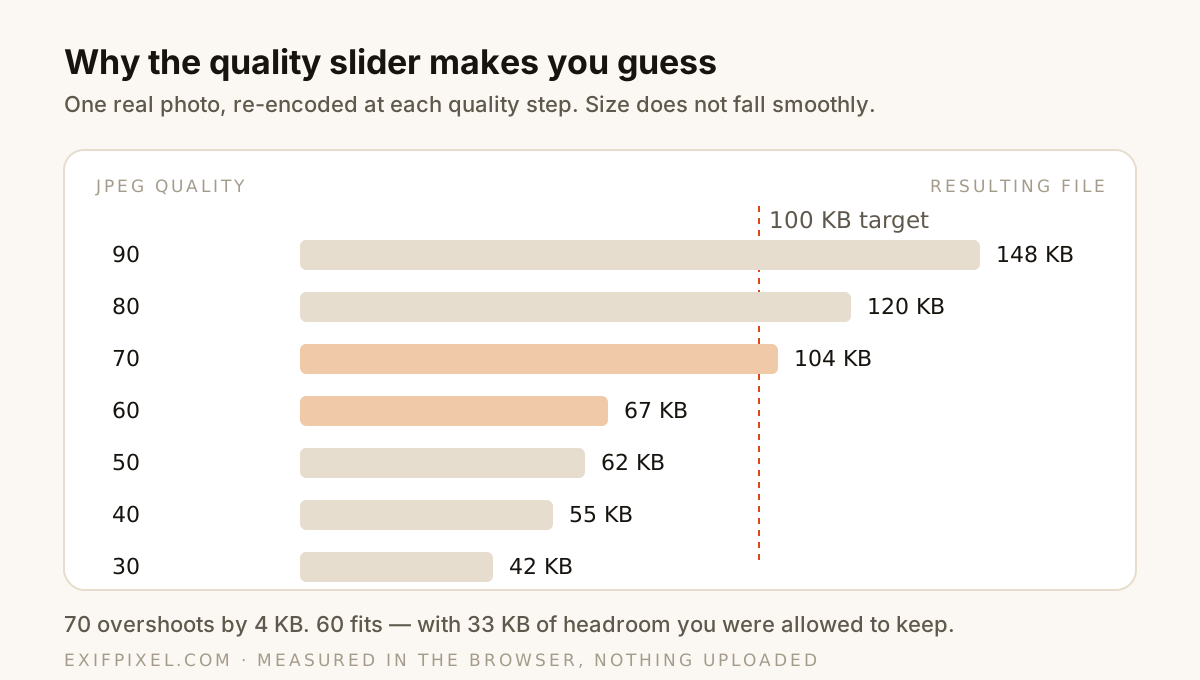
There is no slider position that lands near 100 KB. You either fail the upload or hand over a third of your quality for nothing, and you only find out by exporting, checking the file size, and trying again.
Ask for the size instead
The fix is to invert the controls: state the size you need and let the encoder search for the highest quality that fits underneath it. That search takes a computer a fraction of a second and takes a human several rounds of trial and error.
Give it a target instead of a guess. Open Compress Image to Size
Drop the photo, type 100, and you get the best-looking version that fits — done in the browser, with nothing uploaded.
When the target is very small, resize first
Below a certain point, compression alone starts to smear the picture: blocky skies, soft edges, a face that looks like it was photographed through frosted glass. That is the encoder throwing away detail because it has nowhere else to save space.
Reducing the dimensions first is far more effective, because file size follows pixel count.
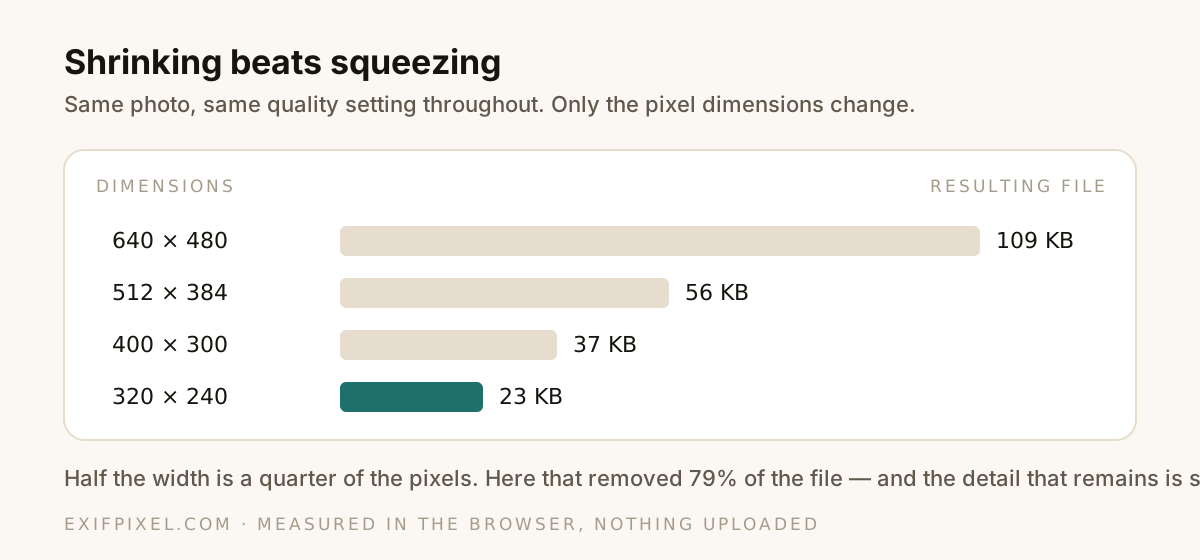
A 12-megapixel phone photo is around 4000 pixels wide. No application form displays it at anything close to that. Bringing it down to 1000–1500 pixels usually gets you under the limit before compression has to do anything drastic.
Bring the dimensions down first. Open Resize Image
Practical rules that hold up
- Read the form properly. "Under 100 KB" and "under 100 KB, minimum 600×600" are different problems, and the second one rules out shrinking your way there.
- Work from the original, not from an already-compressed copy. Each JPEG save discards detail permanently, and the losses stack.
- Use JPG for photographs. PNG is lossless and will be several times larger for the same picture.
- Crop before you compress. Removing background you do not need is free size reduction with no quality cost at all.
- Keep the original. The compressed file is for the form; it is not an archive copy.
About passport and ID photos
These usually come with a minimum resolution and an exact aspect ratio alongside the size cap, so the order of operations matters: crop to the required ratio first, resize to the minimum they allow, then compress to the target. Doing it the other way round means compressing detail you are about to throw away anyway.
Get the aspect ratio right first. Open Aspect Ratio Changer